Showing posts with label government services. Show all posts

Sunday, October 29, 2023

Online NBI Clearance Renewal: the Fastest Way in getting your NBI Clearance

There was one time when I was required to immediately submit an NBI Clearance. I was thinking back then that it was impossible for me to get an NBI Clearance because of the usual process of booking a schedule at the NBI website, the very long lines during biometrics, and the fact that my name always has a "hit".

The most problematic for me is my name having a "hit" - which means that there is a criminal or a suspected criminal having the same name as me. The result of this is that the release of my NBI clearance is extended by at least one week because the NBI will check their records.

The good news for me is that NBI now has a very fast way for renewing an NBI Clearance. I actually got my new NBI clearance within the day!

Requirements for fast NBI Clearance renewal

The following are the requirements or the important things that you should have so that you can avail of the very fast NBI clearance renewal:

  1. NBI clearance number of your old NBI clearance
  2. Valid government issued ID
You do not need to have an NBI Online account to renew your NBI clearance. It is less hassle than when obtaining a new NBI clearance. The way that I will show you can be done at the home page of the NBI Clearance Online

Step-by-step process for very fast NBI Clearance renewal

1. Go to the NBI clearance online website and look for the "NBI Clearance Online Renewal" and click the "CLICK HERE" button.

NBI Clearance Online Renewal


2. Input your old NBI clearance ID number, mobile number, your name, and birth date then click the "Verify" button.

NBI Clearance Renewal Online

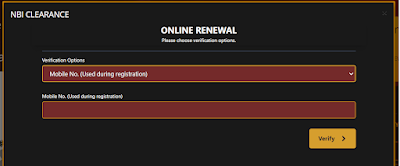
3. Select the verification options. You can choose from one of the following: Mother's information, Mobile No. used during registration, and Email address used during registration.

I selected “mobile no. used during registration” and then I input my mobile number then clicked the “Verify” button.

NBI Clearance Renewal Online

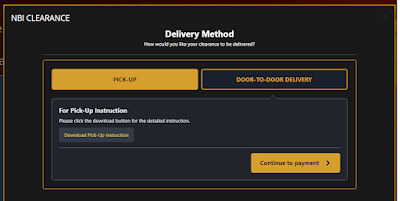
4. The next step is selecting if you want to pick-up your NBI Clearance or have it delivered through door-to-door delivery. I selected pick-up since door-to-door delivery has additional delivery fees plus may take more than one day. I wanted my NBI Clearance to be released within the day. Click “Continue to payment” once you choose the method that you want.

NBI Clearance Renewal Online - Pick-up or delivery

Take note that the pick-up option is only available at NBI Clearance Center, UN Avenue, Manila.

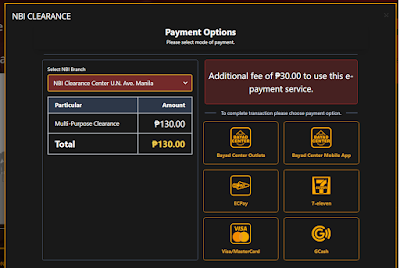
5. The next step is selecting the payment option. I chose to pay at 7-Eleven since it is the most convenient for me. The NBI clearance fee is 130 pesos while the convenience at 7-Eleven is 30 pesos. In total, I paid 160 pesos for the renewal of my NBI Clearance.

NBI Clearance Renewal Online Payment Options

6. The last step is picking up the NBI clearance.

I got my NBI Clearance very quickly. I applied for the renewal of my NBI Clearance online in the morning and I got my NBI Clearance in the afternoon. It is very quick and convenient! I can say that NBI Clearance has the best online system compared to other government agencies.

.

Thursday, October 6, 2022

How to Get RTC and MTC Clearances

Note: this blog post contains the RTC clearance requirements for 2022

There was one time that I was required to get a RTC clearance and MTC clearance. Unfortunately, there are very few online information about how to get these clearances. The most helpful page that have info on RTC and MTC clearances is this FB post of OCC RTC Agoo.

The result is that I wasted time when I went to the office of MTC for the first time. The guard told me to get a police clearance before I can get the MTC clearance. I didn't have a police clearance that day so I had no choice but to leave and get that darn police clearance.

It was a frustrating experience that I do not want you to experience. So here is the handy guide on how you can get the DTC clearance and MTC clearance.

What is RTC? MTC?

RTC is the acronym for Regional Trial Court while MTC is for Municipal Trial Court. These are the lower courts that handle criminal cases.

Companies sometime ask for clearances from RTC and MTC to ensure that the applicant has no pending cases.

Requirements for RTC and MTC Clearances

OCC RTC Agoo listed the following requirements for RTC Clearance:

  1. Police clearance
  2. Municipal Trial Court (MTC) clearance
  3. Documentary stamp

In my experience, the RTC and the MTC in our city only asked for the copy of police clearance. The RTC did not ask for the MTC clearance. Meanwhile, the documentary stamp was not required by both the RTC and the MTC.

I think each RTC and MTC has their own set of requirements. I was just fortunate that our RTC and MTC are not demanding when it comes to requirements. So, you better ask the RTC and MTC in your area about the required documents.

How to Get RTC and MTC Clearances

Getting the RTC and MTC clearances is easy. Just go to the RTC and MTC offices in your town or city and submit the required documents.

Just wait for a few minutes and then you get your RTC clearance and MTC clearance. I waited about 30 minutes to get my MTC and RTC clearances.

Very few companies or institutions require the MTC and RTC clearances so there was no queue when I applied for these clearances.

How Much is the RTC and MTC Clearances

The fee for MTC clearance is 60 pesos. It is less expensive compared to NBI Clearance and Police Clearance.

So that's all the info that you need to know in getting the RTC and MTC clearances.

.
Thursday, August 19, 2021

How to Apply for the Philippine National ID Online (Step 1 Registration)

One of my usual problems when doing some transactions is the lack of a valid ID. Currently, I have an expired PRC ID and a police clearance ID, which I cannot use in some transactions. The only valid ID left is the old Pag-IBIG Loyalty Card (which is sometimes not accepted) and the Philippine passport (which I always leave at home).

That's why I was glad when I saw a National ID registration in the SM mall in our place. Finally, I will have another valid government ID. However, my joy was cut short when the clerk manning the registration booth said that I cannot go to the Step 2 registration booth in SM without applying for a National ID online.

With that, I applied for Philippine national ID online. Here are the steps that I took to apply for National ID online:

Step 1: Go to the Philippine Identification System (PhilSys) website and click the "Proceed" button

Philippine National ID Application Online

Step 2: Enter your mobile phone number or email address and proceed with the application by clicking the "I am not a robot" box and "Send OTP" button.

Philippine National ID Application Online

Make sure that the mobile phone number or e-mail address that you will use is active since this is where PhilSys will send the One-Time Password of your National ID online application.

Step 3: Check your phone or e-mail for the OTP. Input it in the PhilSys website and then click the "Verify" button.

Philippine National ID Application Online

The OTP is only valid for 5 minutes so you should input it immediately.

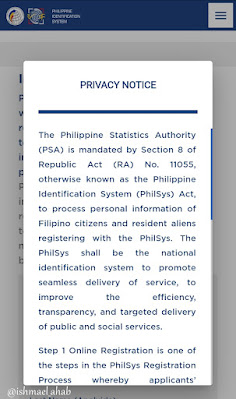
Step 4: Click "OK" to the Privacy Notice.

Philippine National ID Application Online

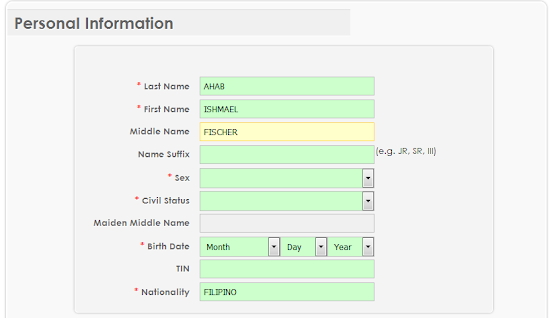
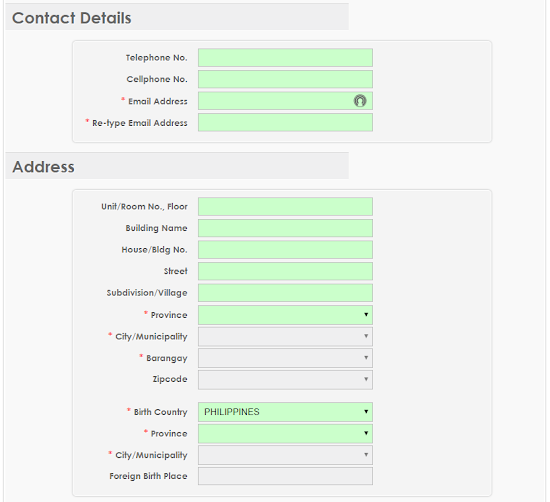
Step 5: Fill up the required information like name, birthday, address etc. and click the "Next" button.

Philippine National ID Application Online

Make sure that you placed the correct spelling of your name and other info. Note that giving false info in the National ID online application is punishable with imprisonment and fine.

Step 6: Review all the information that provided and then click the "Continue" button if everything is correct. Click the "Back" button if you need to correct some information.

Philippine National ID Application Online

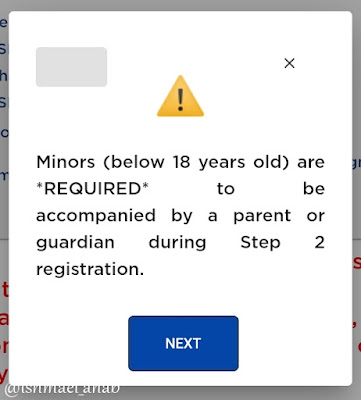
Step 7: Click the "Next" button in the reminders regarding minors applying for National ID online.

Philippine National ID Application Online

And that's finished. A new page will appear that shows your schedule and place for the Step 2 of the National ID application.

Unfortunately for me, PhilSys said that there is no National ID registration center in our place even though there is a registration center in the SM near our home.

Philippine National ID Application Online

I have no choice but to save my application and wait when PhilSys schedule the Step 2 for my National ID application.

NOTE: I read a Facebook post that banks and other institutions do not accept the National ID because it does not bear the signature of the ID holder. Well this is a bummer if true. What’s the point of having a National ID if it cannot be used for transactions with banks and other places. My application for a National ID is a waste of time then?

.

Saturday, June 6, 2020

How to Access DepEd Commons using Cellphone

The bad situation of COVID-19 in our country brings fears to many parents all around the country. Many parents do not want their child to get the virus in schools. Many parents asked the Department of Education (DepEd) to stop the school year. Many parents are thinking of trying online education or homeschooling for their children.

As preparation for hybrid learning, or a mix of online and face-to-face education, DepEd launched the DepEd Commons.

DepEd Commons is an online platform to support the continuous delivery of basic education to Filipino learners. This platform was worksheets, books, and other tools that can be used by parents for teaching their kids or by students who wanted to self-study.

DepEd Commons can be accessed via PC, tablet or mobile phone (cellphone).  The good news is that accessing the DepEd Commons is free and will not use the Internet data of your cellphone. The free access is applicable for Globe, Smart, Sun, TNT, and TM users.

This is how to access DepEd Commons using your cellphone:

1. Open your cellphone’s Internet browser (Chrome, Opera etc.) and type in this address: https://commons.deped.gov.ph. You can also click here to access DepEd Commons.


2. Scroll down and fill up the following information: (1) Type of School (public or private), (2) Name of School, (3) Type of User (Student or Teacher), (4) Name, and (4) Email.

Access DepEd Commons Using Cellphone

It actually doesn’t matter what information you put. Just choose any school type and any school. You can also choose any type of user. I actually placed by pen name (false name) and false email address and DepEd Commons granted me access.

3. On the next page, select the Grade Level of your student

Access DepEd Commons Using Cellphone

DepEd Commons has online tools for all grade levels, including kindergarten and senior high school. My children are still in Kindergarten so I chose Kindergarten.

Access DepEd Commons Using Cellphone (Kindergarten Learning Tools)

Sadly, the learning tools for Kindergarten in DepEd Commons is only for Filipino Subject and only for a few letters of the ABAKADA.


4. Choose the subject or learning tools that you want

Access DepEd Commons Using Cellphone (Filipino Subject for Kindergarten)

I choose the tools or learnings on “Titik Ii, Oo, at Ee” and the result is 13 learning activities or pagsasanay. Unfortunately, choosing one of the pagsasanay will bring you to a website that is outside of DepEd Commons. You will incur or use your Internet data to access the said website.

Access DepEd Commons Using Cellphone Not Free for Using Learning Tools

Click OK if you want to proceed. 

The link brought me to a quiz page.

Access DepEd Commons Using Cellphone (Learning Game)

The quiz page can be used by parents in teaching their children. This quiz, for instance, will help me test our kindergarten kids  ABAKADA.

Access DepEd Commons Using Cellphone (Filipino Subject Quiz)

So that is how parents can access DepEd commons using their cellphones.

I was disappointed with DepEd Commons because the learning tools available are very few and not that useful for parents who want to teach their children. Let us hope that DepEd will upload more learning tools, especially now that they are pushing for the opening of classes in August even if COVID-19 pandemic is still raging in our country.
.

Saturday, May 2, 2020

How to Apply for Pag-IBIG Calamity Loan Online 2020

It is almost two months since the government declared the Enhanced Community Quarantine (ECQ) lockdown and many of us are experiencing difficulties in our life. Many of us, particularly the no-work-no-pay workers, have no more money to buy food and other daily needs. The sad part is that many of us did not receive any help from DSWD or DOLE. In this of great need, many of us had no choice but to apply for loans. One of the loans that we can apply for is the CALAMITY FUND of Pag-IBIG Fund.

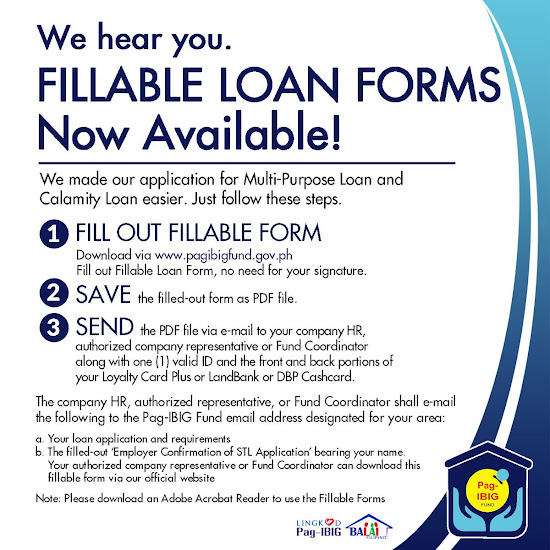
Due to the threat of COVID-19 or Wuhan coronavirus, Pag-IBIG Fund made the application processes for calamity loan all online. Here are the 3 easy steps to apply for Pag-IBIG Multi-Purpose Loan (MPL) or Calamity Loan using your e-mail:

Pag-IBIG Calamity Loan Online Easy Steps

1. FILL OUT or accomplish the Multi-Purpose Loan (MPL) or Calamity Loan Application Form. You can download the forms at the Pag-IBIG Fund website by clicking these links:


Answer the form using Adobe Acrobat or other PDF reader software like Foxit Reader. Save the form after answering it. You do not need to print or sign the form.

2. SAVE the filled-up MPL Application Form or Calamity Loan Form as PDF file.

3. SEND via email to your company HR, authorized company representative or Fund Coordinator the following:

  • PDF file of MPL application form or Calamity Loan Form
  • Photo of one (1) valid ID
  • Photos of the front and back portions of your Pag-IBIG Loyalty Card Plus, or LandBank or DBP Cashcard the 


You are done with your Pag-IBIG Multi-Purpose Loan or Calamity Loan application once you do the FILL OUT, SAVE, and SEND. Your employer or your company will do the rest of the process. All you have to do now is to follow-up with your employer or company if they already submitted your loan application to Pag-IBIG Fund.

For additional information, here are the e-mail addresses of Pag-IBIG Fund where your employer should send your Multi-Purpose Loan of Calamity Loan application.

Pag-IBIG Calamity Loan Online Email Addresses for NCR and Luzon

Pag-IBIG Calamity Loan Online Email Addresses for Visayas and Mindanao

If you have questions or complaints about Pag-IBIG Multi-Purpose Loan or Calamity Loan, please contact Pag-IBIG Fund via email at contactus@pagibigfund.gov.ph or through the Pag-IBIG Fund Facebook page.

The images used in this website came from the Pag-IBIG Facebook page
.
Sunday, October 7, 2018

How to Do Philhealth Online Registration

Philhealth is essential in ensuring that me and my family are covered during medical emergencies. In fact, I availed Philhealth medical coverage 4 times: twice when My Beloved Wife gave birth to our two children, and twice when my son was hospitalized.

Our Philhealth coverage is actually deducted from our salaries. Now, many people wanted to know about the status of their Philhealth contribution. It can be done by going to Philhealth office or asking the Human Resource office of your company. Another way, which I believe is the most convenient, is by doing the Philhealth online registration.

If you are interested in Philhealth online registration, here is your handy guide:


Philhealth Online Registration

Take note that Philhealth members who are employed, self-employed, OFWs, and retirees (either government or private sector) can use this online facility.

2. Fill-up your personal information at the online form. Make sure that you know your Philhealth Number.

Philhealth Online Registration

3. You can also upload any of the following documents to ensure that your Philhealth online registration will be approved:

Philhealth Online Registration

Affidavit of Baptismal Certificate
Alien Certification or Immigrant Certification of Registration
AFP ID
BSP ID
Barangay Certification
Birth Certificate
Certification fro the National Council for the Welfare of the Disabled Person
Company ID
DSWD or Local Social Welfare Development  Officer (LSWDO) Certification
Driver's License
GOCC ID
GSIS e-Card
HDMF ID
Insurance Commission ID
IBP ID
NBI Clearance
OFW ID
OWWA ID
Passport
Police Clearance
Postal ID
PRC ID
Seaman's Book
SEC ID
Senior Citizen's Card
SSS Card
Voter's ID

Take note that Philhealth online registration system will only accept JPG, PNG, GIF, and PDF file types. The scanned document should be clear and readable, and the file size per document should not exceed 2 MB.

4. The last step is to just answer the captcha and tick the check box for the attestation and then click “Submit Registration”.

And those are the easy steps for Philhealth online registration. Just wait for the approval of your application in your e-mail.
.

Friday, November 20, 2015

How to Apply for NBI Clearance Online

The National Bureau of Investigation (NBI) finally activated the much needed upgrade in the processing of NBI clearance. That upgrade is transferring most of the procedures online.

I just discovered this new procedure when I applied for an NBI clearance this month. I was told that I don’t need to go to NBI office and suffer the usual “pila”. All I have to do is to visit the NBI website and set a schedule for the processing of NBI clearance.

I’m cynical that this new system actually works. (actually, I’m always cynical when it comes to the Philippine government). I was proven wrong because I processed and got my NBI clearance with minimal inconvenience.

Here is the step-by-step process that I did to apply for an NBI clearance online:

NOTE: The procedures in this post are for those who will use the Online NBI Clearance system for the first time.

Step 1: Go to the NBI Clearance website.

Step 2: Fill-up the application for First Timer or New Applicant in the right side of the NBI Clearance website. Click the “I Accept Terms of Service” and the “Sign Up” button after you filled up all the required details.

Online NBI Clearance - Step 2
First Timer or New Applicant sign up form on the right side of the NBI website.

Step 3: Click “I Agree” on the “Acceptance of Terms and Conditions” pop-up that will appear.

Online NBI Clearance - Step 3

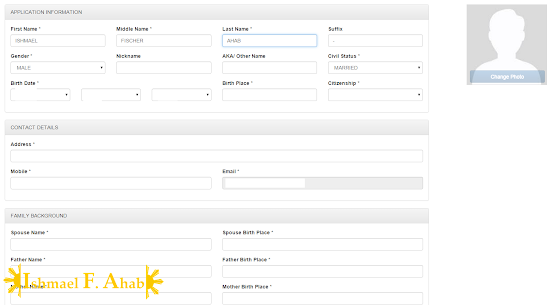
Step 4: Fill-up the required information in the online NBI clearance form in the next page. Click “Save Information” button once done.

Online NBI Clearance - Step 4

Step 5: Click on the “Apply for Clearance” in the next page that will appear.

Online NBI Clearance - Step 5

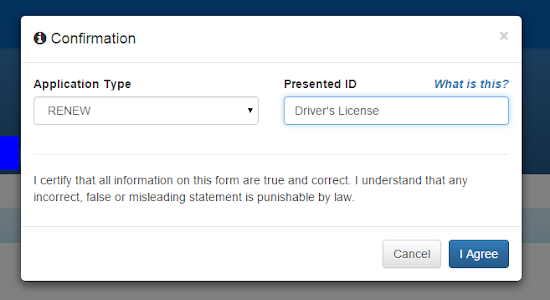
Step 6: In the pop-up that will appear,  choose “Renew” if you are renewing your NBI clearance. Type in the ID that you will use when claiming your NBI clearance. Click the “I Agree” button.

Online NBI Clearance - Step 6

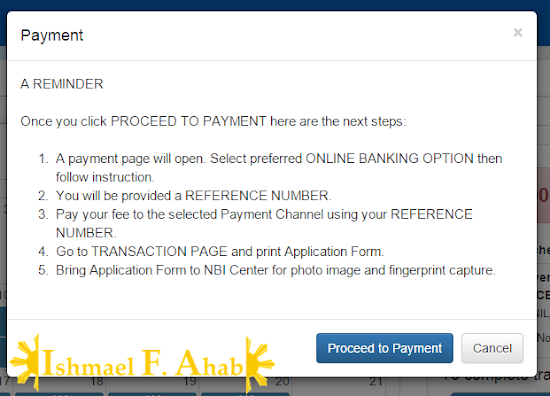
Step 7: Click “Okay” to the reminder that will appear next.

Online NBI Clearance - Step 7

Step 8: Select the NBI branch and the date when you want to process your NBI clearance. You are required to personally appear at the NBI office for biometrics and picture-taking. Also, select the purpose and the details of your NBI clearance application.

Finally, you have to choose one of the following payment options: (1) Banks, over the counter, (2) Banks, online, (3) Mobile payment, and (4) Bayad Center. I chose the first option when I applied for the renewal of my NBI clearance.

Online NBI Clearance - Step 8

Step 9: Read the reminders and then click “Proceed to Payment”

Online NBI Clearance - Step 9

Step 10: Choose the bank where you want to pay the NBI clearance renewal fee. You can choose from the following banks: (1) Metrobank, (2) BPI, and (3) BDO.

I chose Metrobank because they don’t charge any service fee. BPI charges 50 pesos service fee while BDO charges 25 pesos.

Online NBI Clearance - Step 10

You’re successful in doing this step when you receive a confirmation email from NBI/DragonPay.

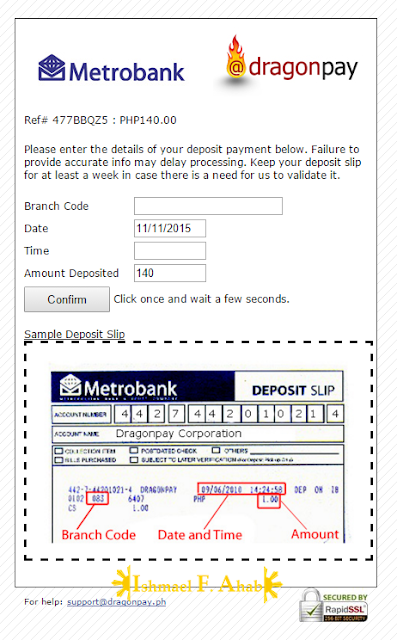
Step 11: Follow the payment instructions and then pay the specified NBI clearance fee. Keep the deposit slip or the payment slip because you will need it later when you go to the NBI office. Click on the confirmation link emailed to you by NBI/DragonPay and confirm your payment.

Online NBI Clearance - Step 11
Payment confirmation form by DragonPay.

Step 12: Go to NBI branch on your appointed schedule. Show your deposit slip or payment slip and have your photo taken and then fingerprinting.

Step 13: Pickup your NBI clearance at the NBI office on the date given to you during your fingerprinting.

These are all the steps that you must follow. They are quite plenty but they are easy to follow. In fact, I am so glad that NBI improved their system. I didn’t experience any hassle because I only spent less than 30 minutes waiting for the fingerprinting and photo capture.

NBI’s online clearance application system is a milestone to the agency. I hope that they continue to improve their system.
.