Showing posts with label Real Life Tips. Show all posts

Sunday, April 28, 2024

Paano Linisin ang Iyong Window-type Aircon? (Do-it-Yourself Cleaning)

Summer ngayon at talaga namang nakakrindi ang init! Kaya naman marami nang Pinoy ang gumagamit na ng aircon para makatulog nang mahimbing sa gabi.

Ang isang problema lang sa aircon ay ang naiipong alikabok at dumi sa filter nito. Ang resulta ay pagyeyelo ng aircon na pumipigil sa pagpapalamig ng kwarto.

Isang gabi ay nagyelo ang aircon namin at di na gumana. Nagkontak ako ng technician para maglinis ng aircon pero dahil sa busy sila ay mapupuntahan lang nila kami after three (3) days. At dahil dyan napilitan ako na mismo maglinis ng aming aircon.

Para sa inyong impormasyon, ang aking aircon ay window-type Panasonic aircon.

So paano ko nilinis ang aming aircon? Simple lang at heto ang step-by-step na proses ng do-it-yourself (DIY) na paglilinis ng aircon.

DIY na Paglilinis ng Aircon

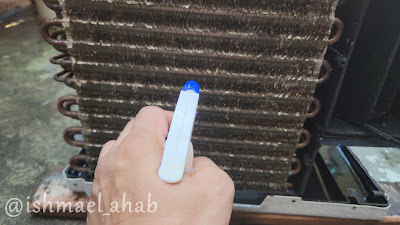
1. Ihanda ang iyong mga gagamitin tulad ng hose, sprayer na halo ng tubig at detergent. Ang aking ginamit ay liquid dishwashing detergent.

2. Alisin ang cover ng aircon at ibalot ng plastik ang mga wirings at electrical components.

DIY Cleaning ng window-type aircon

3. Tirahin ng tubig ang filter at coil gamit ang hose. Ang purpose nito ay para maalis ang kumapit na alikabok sa aircon. Tirahin din ng tubig ang fan at iba pang parte ng aircon upong maalis ang alikabok at lumot.

DIY Cleaning ng window-type aircon

4. I-spray ang detergent mixture sa filter at coil. Siguruhin na ang buong filter at coil ay ma-spray. Hayaang nakakabad sa detergent mixture ang filter at coil nang 30 minutes upang makatulong sa pagtanggal ng pagkakapit ng namuong alikabok sa aircon.

DIY Cleaning ng window-type aircon

5. Tirahin uli nang tubig ang filter at coil upang mabanlawan at maalis ang detergent mixture. Siguruhin na tuluyang mabanlawan ang sabon.

6. Patuyuin ang aircon at punasan ng tuyong basahan ang extrang tubig.

7. Ibalik ang ang electrical components at switch ng aircon. Ibalik na din ang cover, housing at filter ng aircon.

8. Ibalik mo na uli ang aircon sa kanyang lagayan sa iyong kwarto.

9. Paandarin ang aircon upang ma-test kung gumagana at maglalabas ng malamig na hangin.

At yan ang 9 na easy steps sa paglilinis ng aircon.

Mga Paalala sa Paglilinis ng Aircon

Heto ang dapat mong tandaan upang maging success ang DIY na paglilinis mo:

1. Siguruhing kayang buhatin ang aircon. Magpatulong sa mga kasama sa bahay kung hindi kaya ang bigat.

2. Huwag gumamit ng suka o acidic na kemikal na corrosive sa mga metal parts ng aircon.

3. Huwag gumamit ng bleach o kemikal na may matapang na amoy na makaapekto sa ilalabas na hangin ng aircon.

4. I-check kung may tagas ang mga tubo ng aircon. Kung meron ay kailangan mo nang ipatingin sa technician ang iyong aircon.

Heto ang lahat ng aking tips sa DIY na paglilinis ng window-type aircon. Panoorin ang ginawa kang video bilang dagdag gabay:


Kung may tanong ka then mag-iwan ka ng comment o i-messgae mo ako sa Facebook. Follow mo na din ako sa Youtube.

.

Friday, February 17, 2017

How to View Your Pag IBIG Loan Online

Do you want to know how much is your housing loan with the Pag-IBIG Fund? Do you want to make sure if what you’re paying is reflected to your Pag-IBIG Fund account? Do you want answers to these questions but you have no time to go to any Pag-IBIG Fund office?

Well, I have the same problem as yours and I got all the answers by just a few clicks. I checked my Pag-IBIG Loan online.

Follow the following steps to know more about your Pag-IBIG Loan:

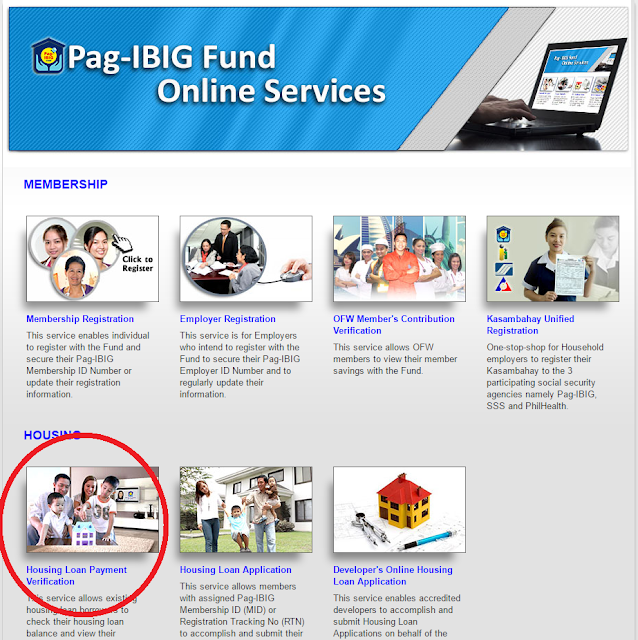
Step 1: Go to the Pag-IBIG Fund Online Services website and click on the Housing Loan Payment Verification.


Pag IBIG Loan Online Services


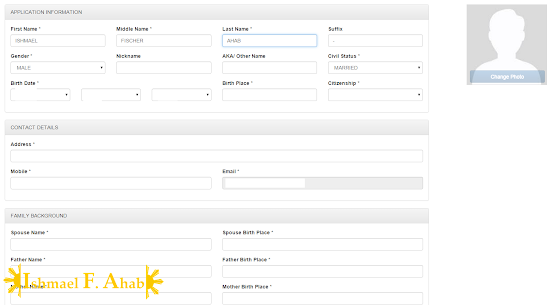
Step 2: Fill-up the necessary details in the “Online Housing Loan Verification” page. You must type-in your Housing Loan (HL) Account No. and your name. You will see your Pag-IBIG Housing Loan Account No. on the billing statement sent to you by Pag-IBIG

Pag IBIG Loan Online

Type-in the Verification Code then click the Proceed button

Step 3: A new page will appear. Just click the Account Summary to see the details of your Pag IBIG Loan like the full loan amount, the outstanding loan balance and other info.

Pag IBIG Loan Online

And that’s it! You can view details of your Pag IBIG Loan in three simple steps.


Other tabs of this page will also allow you to make your billing statement be sent via e-mail.

---

Read more articles about Pag-IBIG Fund:

How to Register Your Account in Pag Ibig Fund Online Registration

Tuesday, November 15, 2016

5 Important Tips When Applying for Philippine Passports in DFA

I noticed that my post How to Cancel Appointment in DFA for Philippine Passport Application is attracting a lot of visitors lately. Many of the readers of that post complained about not receiving their confirmation code and not able to cancel their appointment with the DFA.

I believe that many of the problems cited by commenters may be avoided by doing the following 5 tips when applying or renewing Philippine passport at the Department of Foreign Affairs (DFA):

1. Use Gmail or Yahoo Mail E-mail Address

The DFA website warns the public that their Passport Appointment System don’t work with email addresses hosted by Hotmail, Live, MSN, and Outlook. Using these email addresses means that you will not receive email confirmation of your passport appointment.

DFA recommends passport applicants to use Gmail or Yahoo! accounts when applying or renewing their passport.

2. Avoid Passport Appointment Cancellation

Getting a schedule with the DFA is very difficult because of so many applicants vying for a slot. There were reports that some passport applicants can only get a slot that was scheduled three months in the future.

Treat your appointment schedule like gold. Cancel unnecessary plans that fall on the date of your appointed schedule. Keep in mind that it is hard to get a new schedule. Canceling your appointment is also difficult since DFA’s Passport Appointment System is running into many problems.

3. Make Sure that You Type-in the Right Information

Incorrect information typed in the online forms of the Passport Appointment System is a big no-no. A commenter in my post said that he mistakenly put female as his gender. Others mistakenly spelt their name.

Making a mistake in the Passport Appointment System is not the end of the world, however. You can still correct it when you go to the DFA. Just tell the DFA clerk to correct the wrong information.

 4. NEVER Misspell Your Email Address

This is the worst mistake that you can do while processing your appointment in the Passport Appointment System. DFA sends a confirmation email and the forms that you need when applying or renewing your passport. Wrong email address means that you will not receive DFA’s email and it means that you can never go to the DFA process your passport.

5. Re-Schedule Instead of Cancelling Your Appointment

There are events, like a very important meeting, that will prevent you from going to the DFA for your appointment. If this happens, I suggest that you better schedule your appointment with the DFA instead of canceling it. A commenter to my post said that she was able to re-schedule her passport appointments three times and she got her passport after that.

Do you have questions about applying or renewing your Philippine passport with the DFA? Post those questions and your experiences at the comment box below.  Make sure that you use a Google account so that you can receive my replies to your email.

More tips? Read about the Acceptable IDs for DFA Passport Application

Also read How to Renew Your Philippine Passport
.

Friday, November 20, 2015

How to Apply for NBI Clearance Online

The National Bureau of Investigation (NBI) finally activated the much needed upgrade in the processing of NBI clearance. That upgrade is transferring most of the procedures online.

I just discovered this new procedure when I applied for an NBI clearance this month. I was told that I don’t need to go to NBI office and suffer the usual “pila”. All I have to do is to visit the NBI website and set a schedule for the processing of NBI clearance.

I’m cynical that this new system actually works. (actually, I’m always cynical when it comes to the Philippine government). I was proven wrong because I processed and got my NBI clearance with minimal inconvenience.

Here is the step-by-step process that I did to apply for an NBI clearance online:

NOTE: The procedures in this post are for those who will use the Online NBI Clearance system for the first time.

Step 1: Go to the NBI Clearance website.

Step 2: Fill-up the application for First Timer or New Applicant in the right side of the NBI Clearance website. Click the “I Accept Terms of Service” and the “Sign Up” button after you filled up all the required details.

Online NBI Clearance - Step 2
First Timer or New Applicant sign up form on the right side of the NBI website.

Step 3: Click “I Agree” on the “Acceptance of Terms and Conditions” pop-up that will appear.

Online NBI Clearance - Step 3

Step 4: Fill-up the required information in the online NBI clearance form in the next page. Click “Save Information” button once done.

Online NBI Clearance - Step 4

Step 5: Click on the “Apply for Clearance” in the next page that will appear.

Online NBI Clearance - Step 5

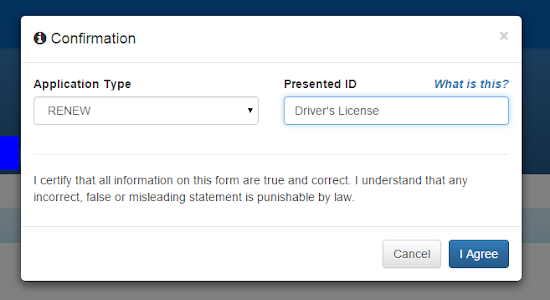
Step 6: In the pop-up that will appear,  choose “Renew” if you are renewing your NBI clearance. Type in the ID that you will use when claiming your NBI clearance. Click the “I Agree” button.

Online NBI Clearance - Step 6

Step 7: Click “Okay” to the reminder that will appear next.

Online NBI Clearance - Step 7

Step 8: Select the NBI branch and the date when you want to process your NBI clearance. You are required to personally appear at the NBI office for biometrics and picture-taking. Also, select the purpose and the details of your NBI clearance application.

Finally, you have to choose one of the following payment options: (1) Banks, over the counter, (2) Banks, online, (3) Mobile payment, and (4) Bayad Center. I chose the first option when I applied for the renewal of my NBI clearance.

Online NBI Clearance - Step 8

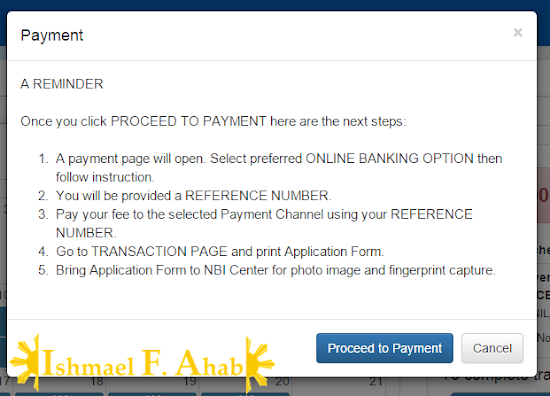
Step 9: Read the reminders and then click “Proceed to Payment”

Online NBI Clearance - Step 9

Step 10: Choose the bank where you want to pay the NBI clearance renewal fee. You can choose from the following banks: (1) Metrobank, (2) BPI, and (3) BDO.

I chose Metrobank because they don’t charge any service fee. BPI charges 50 pesos service fee while BDO charges 25 pesos.

Online NBI Clearance - Step 10

You’re successful in doing this step when you receive a confirmation email from NBI/DragonPay.

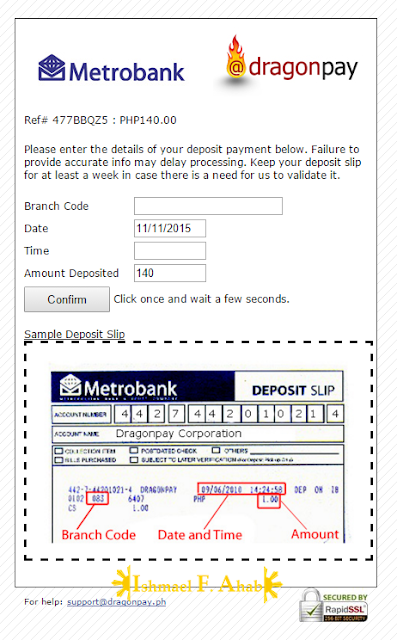
Step 11: Follow the payment instructions and then pay the specified NBI clearance fee. Keep the deposit slip or the payment slip because you will need it later when you go to the NBI office. Click on the confirmation link emailed to you by NBI/DragonPay and confirm your payment.

Online NBI Clearance - Step 11
Payment confirmation form by DragonPay.

Step 12: Go to NBI branch on your appointed schedule. Show your deposit slip or payment slip and have your photo taken and then fingerprinting.

Step 13: Pickup your NBI clearance at the NBI office on the date given to you during your fingerprinting.

These are all the steps that you must follow. They are quite plenty but they are easy to follow. In fact, I am so glad that NBI improved their system. I didn’t experience any hassle because I only spent less than 30 minutes waiting for the fingerprinting and photo capture.

NBI’s online clearance application system is a milestone to the agency. I hope that they continue to improve their system.
.

Wednesday, September 30, 2015

How to Register Your Account in Pag Ibig Fund Online Registration

Good news to members of the PagIBIG Fund. You can now register your account online. This means that you can avoid the long lines that are common in many PagIBIG branches. And since this is an online transaction, you can do this anytime and any place where there is Internet connection.

So, how can you register your account in Pag IBIG Fund Online Registration? Here are the easy steps:


2. On the page that will appear, choose “Register as a New Member” then click Continue at the bottom of the page.

Pag Ibig Fund Online Registration Step 2

3. Enter the code to prove that you are not a robot then click “Proceed”

Pag Ibig Fund Online Registration Step 3

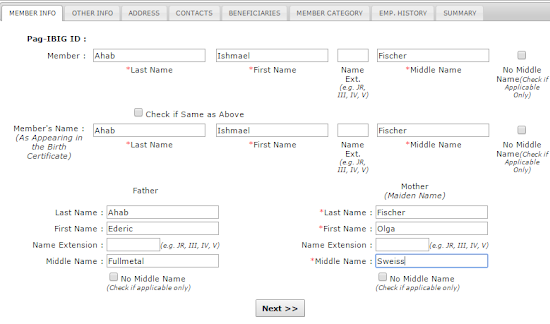
4. Fill up the form that will appear. Make sure that your name, the name of parents, and other info are correct. Just click the Next button to go to the other part of the online forms, which are: Other Info, Address, Contacts, Beneficiaries, Member Category, Emp. History, and Summary

Pag Ibig Fund Online Registration Step 4

5. When you reach the Summary tab or part of the form, you can review your personal details prior to submission to PagIBIG Online Membership Registration. Click Review MDF to review your online registration to PagIBIG Fund.

I highly suggest that you review the information that you entered before clicking the Submit Registration button. You can edit incorrect information by clicking Back. Make sure that all information are correct so as to avoid problems with your PagIBIG Fund account later on.

Pag Ibig Fund Online Registration Step 5

Click Submit Registration button after your review. The Successful Registration page shall indicate that the registration process was completed.

Registering your account using the Pag IBIG Fund Online Registration is quite easy. It’s just 4 steps. I highly recommend that you use it to avoid the hassles and keep your PagIBIG Fund account updated.

Saturday, April 11, 2015

How to Obtain Your Baby’s Birth Certificate from Manila City Hall

Every child born in the Philippines is required to have a birth certificate. Our Little Ahab is not exempted from this requirement so I went to Manila City Hall to request for his birth certificate from the Civil Registry Office.

Why do I have to go to Manila City Hall for my baby’s birth certificate instead of going directly to National Statistics Office? Well, the reason is that the hospital where Little Ahab was born is located in Manila. Another reason is that the birth certificate from the National Statistics Office (NSO) will only be available 6 months after Little Ahab’s birth.

Do you want to know how to obtain your birth certificate from NSO? Read my post "NSO Birth Certificate Delivery".

Requirements for Birth Certificate Request

The following are the requirements when requesting for birth certificate from the Civil Registry Office:

1. Certificate of Live Birth from the hospital or the midwife

2. Application Form for Birth Certificate, which is available at the Civil Registry Office

3. 50 pesos for local copy of birth certificate, 160 pesos for SECPA with NSO authentication, 190 pesos SECPA with NSO authentication and transmittal, and 240 pesos for SECPA with NSO authentication and transmittal with supplemental

Procedure in Requesting for Birth Certificate from Manila Civil Registrar

Step 1: Get application form from the “Step 1” window. Fill out the form then return it to “Step 1” window with the photocopy of Certificate of Live Birth. The clerk might require you to show the original Certificate of Live Birth.

Step 2: Wait for your baby’s name to be called by the clerk at “Birth Certificate Application” window to get the form that already has the registry number and fee.

Step 3: Pay fee at the “Payment” window.

Step 4: Go to the “Scheduling” window to get the schedule when you should pick up the birth certificate. Don’t forget to get the claim stub.

Step 5: On the day indicated on your claim stub, go to the “Releasing Section” and show your claim stub and receive your baby’s birth certificate.

Requesting your baby's birth certificate from Manila City Hall are easy with the above 5 steps. I spent about 1 hour from Step 1 to Step 4. Manila's Civil Registry Office requires birth certificate applicants to return the next day just to get the birth certificate.
.


Sunday, March 8, 2015

How to Renew Your Philippine Passport

I previously posted about the 7 handy tips that you must know when renewing your Philippine passport. Those 7 tips will help you avoid mistakes that will cause hassle to your day in DFA Consular Office.

Now, in this post, I list the steps that I went through when I renewed my Philippine passport last December last year. Take note that the steps posted here is only for DFA Consular Affairs office in ASEANA Business Park located along Macapagal Boulevard, Paranaque City.

Before going further to the step-by-step procedure, you should know first the following requirements for Philippine passport renewal:

1. Your expired or expiring Philippine passport
2. e-Passport Application Form (with confirmed appointment) that you got from the DFA online appointment system
3. At least two valid IDs that contain your recent photo, refer to my post “Acceptable IDs for Philippine Passport Application” for the list of valid Ids
5. Photocopy of expired or expiring Philippine passport. The pages that you must photocopy are the page that contains your photo and details, and the last page of the Philippine passport.
6. Supporting documents that will prove your identity. These documents are optional but you should bring it just in case the DFA demands it. Read my post “Acceptable IDs for Philippine Passport Application” for the list of acceptable supporting documents.

Philippine Passport
(Source: Wikipedia)

Step-by-Step Procedure in Renewing Your Philippine Passport


Step 1: Set appointment in the DFA website

The very first step is by going to the DFA website to set an appointment for your Philippine passport renewal. Their system will let you choose the date and time when you will go to DFA – Consular Affairs Office. You can also set an appointment not only to the Consular Affairs Office but also to the DFA satellite offices around the country.

Read my post “How to Set an Appointment for Philippine Passport Application” to guide you in making an online appointment with the DFA.

Step 2: Appointment Verification

Enter Door 5 of the Consular Affairs Office and look for the booth where you can have your appointment and documents check. Make sure that you have the complete documents before proceeding to this step.

Step 3: Checking of Application Form and Requirements

Go to Door 1 – ground floor for another verification and checking of your passport renewal application form, IDs, and other requirements. This is the step where the DFA clerk assesses you application. Make sure that you already have the photocopy of your passport, your IDs, and other documents before going to this step. You’ll get a billing form in this step.

Take note that this is where you will spend a long time queuing in this step. I actually spent almost an hour waiting in line.

Step 4: Payment of Fees

Go to the second floor (of Door 1) and look for the Cashier Window where you can pay the fees for Philippine passport renewal. Just provide the Billing Form that you obtained in Step 3 when paying. Don’t forget your obtain your official receipt.

Step 5: Processing of Passport Renewal

Go to the booth where you’ll get the queue number then wait for your number to be called. This is the step for personal data encoding, photo capturing, and finger scanning. The queue for this step is also quite long so make sure you have a book or tablet to while away the time. Don’t forget to obtain the Claim Slip after this step.

Step 6: Claim Your Philippine Passport

Return to DFA Consular Affairs office on the date indicated on your Claim Slip. Enter Door 5 and go to the Releasing Section (Window 36) and give your official receipt and Claim Slip to the clerk. Wait for your name to be called to get your new Philippine passport.

I spent less than 30 minutes before I got my new Philippine passport. I suggest that you check if your name and other details in your passport are correct before you leave the DFA Consular Affairs office.

Take note that Philippine passports unclaimed for 6 months or more will be cancelled.

So these are the steps in renewing your Philippine passport in the DFA Consular Affairs Office. Please be reminded that DFA may change the procedures and the steps posted here might not be applicable in the future.

---

Do you have other concerns with the Philippine passport? Be guided by reading the following posts:

Tips on Applying for a Philippine Passport
How to Set an Appointment for Philippine Passport Application
7 Handy Tips for a Hassle-Free Renewal of Philippine Passport
How to Cancel Appointment for Philippine Passport Application
Acceptable IDs for Philippine Passport Application
Applying for a Passport? How to go to DFA Office

Share your questions or reactions regarding the renewal of Philippine passport by a leaving a comment on this post.
.

Wednesday, June 4, 2014

How to Correct Your PRC License

Registration of professionals and the PRC license renewal have plenty of steps. Aside from that, Filipino professionals had to fill-out many forms and submit a lot of documents. This means that the probability of error is great. It is not surprising that some PRC license received by Filipino professionals have incorrect information.

Good thing that the Professional Regulation Commission (PRC) corrects wrong information on the PRC license. Filipino professional can do the correction by making a petition for correction of entries/ data.

Requirements in Correcting Information on Your PRC License


1. PRC Petition Form, which is officially known as PRC SRB Form No. 0002. You can download the form here.
2. Passport size colored picture in plain white background with complete name tag,
3. Money for payment of fees.
4. Community Tax Certificate or cedula

PRC license


You should also bring your PRC license (PRC ID) and the documents that support the correction that you are petitioning.

For correction of your name or for the correction of birth date you must bring the following supporting documents: NSO Birth Certificate, Marriage Certificate from the National Statistics Office (for married Filipino professionals only), and personal affidavit.

For the reversion to maiden name and change of legal status due to death of the spouse, annulment of marriage, and the presumptive death of an absent spouse; you must bring the following supporting documents: NSO birth certificate, NSO death certificate (in case of death), Certified copy of the court's decision (in case of annulment or presumptive death), and certificate of finality or entry of judgment (in case of annulment or presumptive death).

For the change of married name to another married name due to remarriage you must bring the following supporting documents: NSO birth certificate, NSO death certificate (in case of death), Certified copy of the court's decision (in case of annulment or presumptive death), and certificate of finality or entry of judgment (in case of annulment or presumptive death), NSO certificate of marriage of the latest (subsequent) marriage.

Procedures in Correcting Information on Your PRC License


1. Fill-up the PRC petition form.

2. Proceed to Registration Division  at the ground floor of the PRC Central Office main building for verification of your registration. Teachers should proceed to the Office for Professional Teachers at the 3rd floor of the PRC Central Office annex building. Marine Deck and Engineer Officers should proceed to the Marine Deck/Engineer Division at the 4th annex building.

3. Proceed to the Records Section the ground floor of the annex building for the verification of examination records.

4. Pay fees at any of the cashier windows in the PRC Central Office and obtain the official receipt.

5. Proceed to the Customer Service Center for the notarization of your petition and pasting of documentary stamp.

6. Submit duly accomplished PRC Petition Form to the PRC Regulations Office at the 2nd floor of the main building together with the official receipt and other required documents.

Note: These procedures are only applicable in the PRC Central Office at P. Paredes St. cor. Morayta St., Sampaloc, Manila.

Do you want to know how to change the name on your PRC License due to marriage? Read this blog post. Also read my tips for PRC license renewal.

Saturday, May 31, 2014

Procedures for PRC License Renewal at SM Business Center

PRC license renewal is already available at selected Shoe Mart (SM) malls nationwide. As I had mentioned in an earlier blog post, Professional Regulation Commission (PRC) satellite offices are present in nine (9) SM Malls in Metro Manila and four (4) SM mall in the provinces of Cavite, Laguna, and Batangas.

But a more good news is that you can also have your PRC license renewed by going to any SM business center. This is good news because professionals can renew their license without going to any PRC office. Renewal can even be done before or after shopping.

PRC License Renewal

Professionals who want to renew their PRC license at SM Business Center should follow these general procedures:

1. Fill out the PRC license renewal form at the Business Center of any SM Mall.

2. Pay at the SM Business Center the following fees: assessed fee for PRC license renewal, photo fee, and convenience fee. Additional courier service fee should be paid if the professional want his/her PRC (professional) license delivered to his/her address indicated in the renewal form.

3. If you paid the courier service fee then you just need to wait for your PRC license to be delivered at your address.

Those who did not pay the courier service fee must claim the PRC license on the date indicated in the claim stub.

Here are some reminders for PRC license renewal at SM business Center:

Representatives claiming the PRC license must present the official receipt, the claim stub, the ID of the representative, and a letter of authority or Special Power of Attorney (SPA) from the professional.

The photo fee, convenience fee, and courier fee are collected by SM Mart. Only the assessed renewal fee form part of PRC's fees.

To know more about PRC license renewal, please read these blog posts:

Tips on Renewing Your Professional License at PRC
How to Change Your Name on PRC ID due to Marriage
How to Apply for PRC Express ID
Authorization for PRC License Renewal

---

Information in this blog post was obtained from the PRC official website.

Thursday, October 31, 2013

Selecting Our Engagement Ring

My Beloved and I are already in the process of selecting our wedding rings as our wedding day is just around the corner. This reminds me of the day when I selected an engagement ring for my girlfriend (now future wife) years ago. The way we are selecting our wedding rings is somewhat similar to the way I selected our engagement ring.

Engagement ring is just a small thing but it is an essential part of our relationship. This ring is clear symbol that I am choosing my Beloved to be my lifetime partner. Our engagement ring served as the sign to the world that we already have our vows and we are not ashamed of it.

The importance of the engagement ring means that I had to be careful in choosing it. I do not want to buy an engagement ring that my fiancee will not like. I want an engagement ring that she will be proud of wearing.

Choosing our engagement ring is not easy for because there are plenty of things that should be  factored in. One of these, which I think is the primary factor, is the price of the engagement ring. What I want, of course, is an engagement ring that will fit my budget.

Another factor is the design. My Beloved is just a simple lady and I wanted an engagement that will fit that personality. There are plenty of designs for engagement rings. There are those that have big stones (usually diamonds and rubies) and others that have small stones that were discreetly set on the ring. There are those that are just simple bands and then there are engagement rings that have weird designs.

The last factor is the kind of gold that for the engagement ring. I read that there many kinds of gold that can be used for jewelries. There is the Italian gold then there is the white gold. It depends on the mix of gold and other metals that were used to strengthen the jewelry.

I had a very hard time deciding. Good thing that there are plenty of resources in the Internet that can be consulted. I read about Tacori. I read about the advantages and disadvantages of 14 karat over 18 karat engagement rings. I also read about what a perfectly cut diamond should look.

There are also plenty of online shops that makes it easy for us to shop for our wedding rings. One online shop that I discovered is whiteflash.com. I was dazzled by the wide array of wedding rings that are available from this online jewelry store. If you want to see the wedding rings (or even engagement rings) that this online jewelry store has to offer, I highly suggest that you visit whiteflash.com.

In the end, I chose a simple engagement ring that is of white gold and have one small diamond stone. My Beloved liked it and with it she said her very sweet “YES”.

So, for those who are looking for engagement rings, I suggest that you decide based on the factors that I used. What's important is that you will show how much you love your girl when you propose. And the engagement ring that you will buy will symbolize that love.

Tuesday, September 3, 2013

4 Easy Steps in Paying Bills in BPIExpressOnline

I previously said that I’m very lazy when it comes to paying my bills, specifically my Smart Bro bills. I find it a big hassle going to Smart Center or to any bayad centers. This laziness of mine prompted me to look for an easy way pay my bills. That easy way is by paying my Smart Bro bills through BPIExpressOnline.

Paying bills through BPIExpressOnline requires enrolment. So I enrolled my Smart Bro bills first before paying my last month’s due with Smart. For easy steps in enrolling your bills please read my post How to Enroll Bills in BPIExpressOnline.

Step 1: Log-in to your BPIExpressOnline online.

Step 2: Initiate bills payment by hovering the mouse cursor over the “Payments & Reloading” link then click “Bills Payment” and click “Pay Bills Today”. See the image below for details.

Paying Bills with BPIExpressOnline

Step 3: Put in your BPI account details, merchant details, and amount to be paid.

Inputing bills payment details in BPIExpressOnline

This page also allows you to input remarks. I suggest that you type in remarks on this page so you can have a reminder when receive the confirmation email for this payment.

Click the “Submit” button after you checked that the details you entered is correct.

Step 4: Check the details of your transaction on the pop-up window that appeared. Click the “OK” button if everything is correct.

Confirmation page for BPIExpressOnline bills payment

A confirmation page will appear, which confirms that you’re done paying your bill in BPIExpressOnline.

Just follow the steps written here for every bill that you need to pay.

---

For steps in enrolling your BPI account in BPIExpressOnline, please read my post How to Enroll at BPIExpressOnline.

Images for this post were screen-grabbed from BPIExpressOnline.

Monday, September 2, 2013

Barbie Jollibee Party Theme Still Here

I said in a previous post that the Barbie theme for Jollibee Party is is only available up to August 15, 2013. I also said in a previous post that the Barbie theme will be replaced by the Hello Kitty theme for Jollibee party.

I think that not all that I wrote came true. The reason for this is that the Barbie theme is still available for Jollibee party.

Yes. You read that right.

Barbie theme is still available for Jollibee party.


This is a good news for little girls who want to have a Barbie themed Jollibee party.

It seems like the Jollibee extended the availability of this party theme because it is in great demand. Many little girls wanted to have Barbie as their Jollibee party theme.

According to Jollibee Party Website, the Barbie theme is available until October 15, 2013.

The Barbie party theme is still included in the selection of party themes in the Jollibee Party Website.


As of now, the available Jollibee party themes are: Hello Kitty, My Best Friend Jollibee, Jollitown, Barbie and Batman.

So, if you are having a Jollibee party then you can try the Barbie theme before the time runs out.

Remember, Barbie theme is only available until October.

Tuesday, August 27, 2013

How to Enroll 3rd Party Accounts for BPIExpressOnline Fund Transfer

Transferring funds between your BPI accounts is easy with BPIExpressOnline. All you need is to enroll your BPI accounts and then transfer funds in the "My Portfolio" page of your BPIExpressOnline. For detailed steps for transferring funds between your BPI accounts, please visit my blog post How to Transfer Funds in BPIExpressOnline. If you are yet to enroll your BPI account, please read my post How to Enroll at BPIExpressOnline.

There are times that you need to transfer funds to a BPI account that is not yours. Transferring funds to a 3rd party account is not easy because BPIExpressOnline requires enrollment.

Here are the steps when enrolling 3rd party accounts for BPIExpressOnline transfer.

Step 1: To initiate 3rd party account enrollment, go to "My Portfolio" and hover the mouse cursor over the "Funder Transfer" link. Click on the "Enroll Third Party Accounts" link on the drop down menu.


Step 2: The next step is selecting the method of enrollment that is most convenient to you. There three methods that you can choose from. These methods are: "Print, Sign and Mail"; "Print, Sign and Submit Form to Your Branch"; and "Visit Your Branch". Please click the image below for a larger view.


I selected the "Print, Sign and Submit Form to Your Branch" method in this case. You can select the method that you want by clicking the radio button beside your selected method.

Step 3: The next step is that you fill out the details of the 3rd party account enrollment. Please click the image below for a larger view.


Select your BPI account that you want to be source of the funds. Type in the joint account indicator (JAI) number. Then you should type in the account name and account number of the 3rd party account.

Check if you typed in the correct info then click the "Continue" button.

Step 4: Verify the correctness of your data on the "Third Party Funds Transfer Enrollment Form". Click the "Submit & Print" button if you see no error in the form. Please click the image below for a larger view.


A confirmation page will appear after you clicked the "Submit & Print" button.

Step 5: The last step is submitting the "Third Party Funds Transfer Enrollment Form" to the branch where your BPI account is based. The BPI branch staff will process the enrollment. All you need to do is wait for the 3rd party account to appear to your BPIExpressOnline account.

Reminders for BPIExpressOnline Fund Transfer Enrollment


1. Please take note that only 20 is the maximum number of accounts that can be enrolled in a BPI account number. Meanwhile, 140 is the maximum number of accounts that can be enrolled per client. "Accounts" in this case bills or merchants and government institutions enrolled in bills payment, Express Cash or Express Money Order cards enrolled for reloading, prepaid mobile numbers enrolled in Prepaid Cellphone Reload facility and all third party account enrollments.

2.The third party accounts that are eligible for BPIExpressOnline fund transfer facility are the following: Express Teller Savings or Checking Accounts (individual account), Passbook Savings Account (individual account), Maxi Accounts for Individuals, Platinum Savings or Platinum for Kids, BPI Direct Savings and Checking Accountd, and Pangarap Savings.

---

Images on this blog post was obtained from BPIExpressOnline

Monday, August 19, 2013

How to Enroll Bills in BPIExpressOnline

I'm a forgetful person and one thing that I usually forget to do is paying my Smart Bro bills. This activity is at the fringe of my mind but the Smart Center is out of my way so I forget about it. I don't want to forget about paying my Smart Bro bills so I decided to enroll my Smart Bro bill to my BPIExpressOnline account.

Enrolling bills in BPIExpressOnline is required before I can pay my Smart Bro bills so I have no choice but to enroll first before paying.

Take note that before you can pay your bills through BPIExpressOnline, you should enroll your BPI account first. Please read my post on how to enroll your account in BPIExpressOnline.

Here are the easy steps that I did to enroll my Smart Bro bills.

Step 1: Log-in to your BPIExpressOnline account.

Step 2: Hover the mouse pointer over “Payment & Reloading” then hover over “Bills Payment” and then click on “Enroll All Other Bills”.

Step 1 of enrolling for BPIExpressOnline Bills Payment

Step 3: Fill up the necessary details. Choose the BPI account that will be the source of fund for payment. Type in the Joint Account (JAI) number. Select the company, which in this case is Smart Communications Inc. Finally, type in the reference number of you billing account.

Check if you placed correct information before clicking the “Submit” button. For details, see the image below.

Step 2 of BPIExpressOnline Bills Payment

Step 4: A pop-up window confirming if you placed the correct info (see imae below) will appear. Click the “OK” button if all the info are correct.

Step 3 of BPIExpressOnline Bills Payment

Step 5: The Confirmation Page will appear. This means that you are now done enrolling your billing account. You can now pay your bill through the BPIExpressOnline.

Confirmation page for enrolling for BPIExpressOnline Bills Payment

Now you must read my post on how to pay your enrolled bills in BPIExpressOnline.

Saturday, August 17, 2013

5 Easy Steps in Checking ATM Balance in BancNet

BancNet is one of the largest networks of banks in the Philippines. Their website says that BancNet is the country’s “largest Automated Teller Machine (ATM) consortium”. This network is composed of large banks including Allied Bank, Bank of Commerce, China Bank, RCBC, UCPB and Land Bank.

One thing that I think is the use of BancNet is in making it easy for people to access their bank accounts through its network of ATMs. But ATM is not only BancNet’s powerful tool. I discovered (with the help of my Beloved) that BancNet website offers myriad of services and of these is balance inquiry.

Here is a simple procedure that you can follow to inquire you bank account’s balance through the BancNet website. Take note that this service is only available for banks that are members of BancNet. Take note that I used RCBC ATM card for this post.

Step 1: Go to BancNet website.

Step 2: Hover the mouse pointer over the “Personal” button and then a drop-down menu will appear. Click on the “ATM Services”.

ATM services of BancNet

Step 3: On the new page that will appear, select your bank in the drop down menu. I selected RCBC Savings Bank in this case.

Selecting RCBC in BancNet

Click the “Go” button after you selected the bank that you want.

Step 4: The “Terms and Condition” page will appear. Just click “I Agree” button to proceed.

Step 5: In the “Balance Inquiry” page, type in the ATM number and your PIN. You also need to select the account type by clicking on the “Choose Account Type” menu. Click the “Submit” after typing in the correct info.

Input bank info in BancNet

Your account balance will now appear.

Reminders

BancNet’s ATM facility is very useful but there are some things that you should keep in mind when using it. First is to make sure that no one is looking when you type in your PIN and when you are checking your balance. Second is that you should not give your ATM PIN to other people.

Wednesday, July 31, 2013

How to Enroll Additional Savings Accounts in BPIExpressOnline

You can have many accounts in the Bank of the Philippine Islands (BPI). You can have a savings account, a checking account and a Dollar account or any account in other foreign currencies. The good thing is that you can enroll all of your different BPI accounts in BPIExpressOnline.

Enrolling your accounts in BPIExpressOnline is very useful because it allows you to see the transaction history of your account through the Internet. You can also transfer funds or pay bills on BPIExpressOnline. This is handy when you don’t have time to go a branch of BPI.

Take note that BPIExpressOnline only allows up to 20 BPI savings account and 20 BPI checking account to be enrolled in their system. I don’t know if anyone have plenty of savings and checking accounts.

Enrolling additional accounts in BPIExpressOnline is very easy. I will teach you how but first you must learn how to register in BPIExpressOnline.

Now, let me teach you how to enroll additional accounts in BPIExpressOnline.

Step 1: Initiate Account Enrollment


Log-in to your BPIExpressOnline account. Hover the mouse pointer over the “My Portfolio” button to make some options to drop down. Click the “Enroll Additional Accounts” button.

My Porfolio page of BPIExpressOnline
Step 2: Selecting Account Type to Enroll

A new page will appear where you will be asked to select the account type that you are enrolling.

Enrolment of savings account in BPIExpressOnline

In my case, I selected the “Savings and Checking Account (with ATM card or Info Card)” option since the BPI account that I’m enrolling is a BPI savings account.

Click the “Select” after you chose the correct account type. The “Reset” button may be clicked if you made incorrect selection.

Step 3: Input Your BPI Savings Account Info
Clicking the “Select” will take you to a new webpage where you will be asked to input your BPI savings account number and the Joint Account Indicator (JAI).

Submission of savings account enrolment in BPIExpressOnline

Joint Account Indicator (JAI) is the 2-digit number located at the lower right of your ATM card. See the image below for details.

Joint Account Indicator - BPIExpressOnline

Click the “Submit” button once you input your BPI savings account number and the JAI correctly.

Step 4: Confirmation

A confirmation page will appear.

Confirmation page of BPIExpressOnline

Just take note of the transaction date and time, and the confirmation number. All you have to do now is to wait for your new BPI saving account or BPI checking account to appear in the portfolio of your BPIExpressOnline account.

Monday, June 24, 2013

Where to Find Unsecured Loans

Preparing a wedding is not easy. I am starting to feel the pressure and one of the source of that pressure is finances. The truth is that me and my Beloved do not have enough funds to pay for the services and requirements for a decent wedding.

I told you about my wedding because I just to say that I realized how hard it is for people who are in dire financial needs. It is the first time for me to be pressured this much because of money. I am now thinking of borrowing money if worse comes to worse.

Image for unsecured loans
(Source: Finish Loans)


I know that borrowing money is never easy, especially for those who have bad history when it comes to finances. It will be hard for them to find a lending institution that provides Loans With No Credit Check.

Good thing that there are lending institutions that offer unsecured loans. These lending institutions allows people to obtain unsecured loans in fast and easy ways. What borrowers need to do is to go to their website and apply for a loan.

These lending institutions are sometimes called as Bad Credit Payday Loans Lenders because they offer loans to people who have bad credit. These institutions are the ones to go to by people who have bad credit because these lending institutions have No Credit Check Cash Advance Loans For Bad Credit.

Having a bad credit is a bad thing but it doesn't mean that the situation is hopeless. There are lending institutions that are ready to help people like you to stand again on two feet.

Monday, May 27, 2013

Help for Your Editing Needs


One of my main jobs in the office is the editing of a major publication that was not updated for more than a decade. I admit that doing editing work is very tough. I should check each section, each paragraph, each sentence and even each word to ensure that my work will be at par to the standards set-up by our office.

With this firsthand experience about editing, I understand why many writers outsource the proofreading and editing of their works. It is a big headache, especially if line per line checking is needed.

Editing may be considered as important as writing as the composition. Your ideas may be good but it will not have impact if your delivery is not good. What I mean here is that if your sentence construction is bad and your spelling is terrible then no one will read your work.

This is the reason why, if you are a writer or even just a college student writing a term paper, you may need editing services.

There are many companies that offer editing services so it will not be a problem in searching for them. The problem you might face, however, is in searching for a company that provides quality editing services.

Using in the Internet will help in your search for a quality editing services provider but to help you further, I suggest that you go this link: https://help.plagtracker.com/dissertation-editing.html 

The link will take to the website of an editing service provider that will be of big help to those who are looking for editing services like you.