Friday, November 20, 2015

How to Apply for NBI Clearance Online

The National Bureau of Investigation (NBI) finally activated the much needed upgrade in the processing of NBI clearance. That upgrade is transferring most of the procedures online.

I just discovered this new procedure when I applied for an NBI clearance this month. I was told that I don’t need to go to NBI office and suffer the usual “pila”. All I have to do is to visit the NBI website and set a schedule for the processing of NBI clearance.

I’m cynical that this new system actually works. (actually, I’m always cynical when it comes to the Philippine government). I was proven wrong because I processed and got my NBI clearance with minimal inconvenience.

Here is the step-by-step process that I did to apply for an NBI clearance online:

NOTE: The procedures in this post are for those who will use the Online NBI Clearance system for the first time.

Step 1: Go to the NBI Clearance website.

Step 2: Fill-up the application for First Timer or New Applicant in the right side of the NBI Clearance website. Click the “I Accept Terms of Service” and the “Sign Up” button after you filled up all the required details.

Online NBI Clearance - Step 2
First Timer or New Applicant sign up form on the right side of the NBI website.

Step 3: Click “I Agree” on the “Acceptance of Terms and Conditions” pop-up that will appear.

Online NBI Clearance - Step 3

Step 4: Fill-up the required information in the online NBI clearance form in the next page. Click “Save Information” button once done.

Online NBI Clearance - Step 4

Step 5: Click on the “Apply for Clearance” in the next page that will appear.

Online NBI Clearance - Step 5

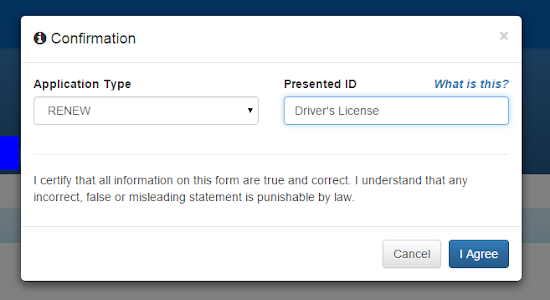
Step 6: In the pop-up that will appear,  choose “Renew” if you are renewing your NBI clearance. Type in the ID that you will use when claiming your NBI clearance. Click the “I Agree” button.

Online NBI Clearance - Step 6

Step 7: Click “Okay” to the reminder that will appear next.

Online NBI Clearance - Step 7

Step 8: Select the NBI branch and the date when you want to process your NBI clearance. You are required to personally appear at the NBI office for biometrics and picture-taking. Also, select the purpose and the details of your NBI clearance application.

Finally, you have to choose one of the following payment options: (1) Banks, over the counter, (2) Banks, online, (3) Mobile payment, and (4) Bayad Center. I chose the first option when I applied for the renewal of my NBI clearance.

Online NBI Clearance - Step 8

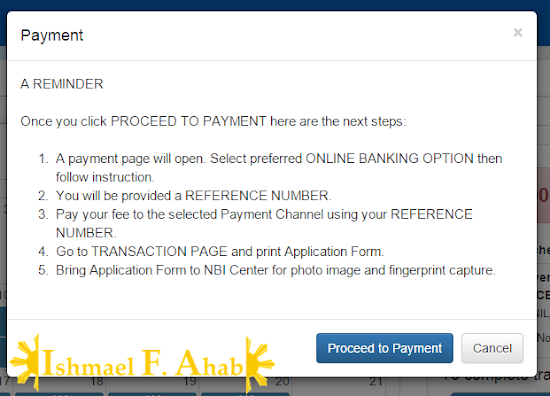
Step 9: Read the reminders and then click “Proceed to Payment”

Online NBI Clearance - Step 9

Step 10: Choose the bank where you want to pay the NBI clearance renewal fee. You can choose from the following banks: (1) Metrobank, (2) BPI, and (3) BDO.

I chose Metrobank because they don’t charge any service fee. BPI charges 50 pesos service fee while BDO charges 25 pesos.

Online NBI Clearance - Step 10

You’re successful in doing this step when you receive a confirmation email from NBI/DragonPay.

Step 11: Follow the payment instructions and then pay the specified NBI clearance fee. Keep the deposit slip or the payment slip because you will need it later when you go to the NBI office. Click on the confirmation link emailed to you by NBI/DragonPay and confirm your payment.
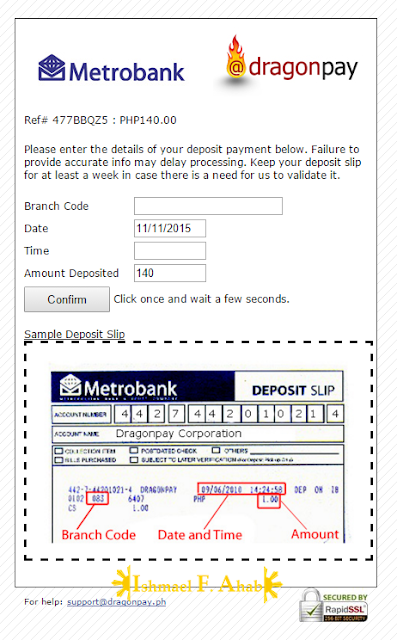
Online NBI Clearance - Step 11
Payment confirmation form by DragonPay.

Step 12: Go to NBI branch on your appointed schedule. Show your deposit slip or payment slip and have your photo taken and then fingerprinting.

Step 13: Pickup your NBI clearance at the NBI office on the date given to you during your fingerprinting.

These are all the steps that you must follow. They are quite plenty but they are easy to follow. In fact, I am so glad that NBI improved their system. I didn’t experience any hassle because I only spent less than 30 minutes waiting for the fingerprinting and photo capture.

NBI’s online clearance application system is a milestone to the agency. I hope that they continue to improve their system.
.

Wednesday, September 30, 2015

How to Register Your Account in Pag Ibig Fund Online Registration

Good news to members of the PagIBIG Fund. You can now register your account online. This means that you can avoid the long lines that are common in many PagIBIG branches. And since this is an online transaction, you can do this anytime and any place where there is Internet connection.

So, how can you register your account in Pag IBIG Fund Online Registration? Here are the easy steps:


2. On the page that will appear, choose “Register as a New Member” then click Continue at the bottom of the page.

Pag Ibig Fund Online Registration Step 2

3. Enter the code to prove that you are not a robot then click “Proceed”

Pag Ibig Fund Online Registration Step 3

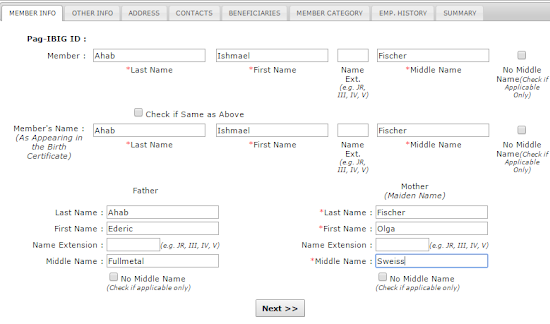
4. Fill up the form that will appear. Make sure that your name, the name of parents, and other info are correct. Just click the Next button to go to the other part of the online forms, which are: Other Info, Address, Contacts, Beneficiaries, Member Category, Emp. History, and Summary

Pag Ibig Fund Online Registration Step 4

5. When you reach the Summary tab or part of the form, you can review your personal details prior to submission to PagIBIG Online Membership Registration. Click Review MDF to review your online registration to PagIBIG Fund.

I highly suggest that you review the information that you entered before clicking the Submit Registration button. You can edit incorrect information by clicking Back. Make sure that all information are correct so as to avoid problems with your PagIBIG Fund account later on.

Pag Ibig Fund Online Registration Step 5

Click Submit Registration button after your review. The Successful Registration page shall indicate that the registration process was completed.

Registering your account using the Pag IBIG Fund Online Registration is quite easy. It’s just 4 steps. I highly recommend that you use it to avoid the hassles and keep your PagIBIG Fund account updated.

Tuesday, August 18, 2015

Why I am Disappointed with the PagIBIG Loyalty Card

I first discovered about the PagIBIG Loyalty Card when I was doing a transaction at a PagIBIG branch in Makati. The brochure says that PagIBIG Loyalty Card can give discounts for medicines, LPG, diesel, and other items from partner establishments.

I’m skeptical at first but I decided to get the PagIBIG Loyalty Card when I read that I could get a 5% discount for medicines from The Generics Pharmacy (TGP). I thought that the TGP discount is very good since I was a regular TGP customer.

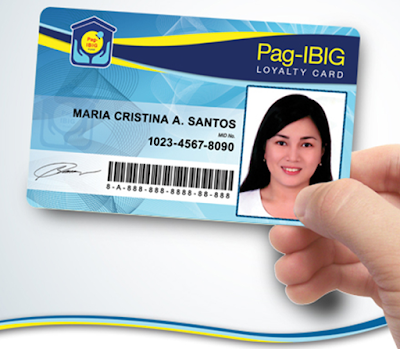
PagIBIG Loyalty Card
The Loyalty Card that disappoints.

I was wrong. Until now I haven’t get any discount from The Generics Pharmacy. The salespeople at TGP branches gave the following excuses:

1. “We don’t give PagIBIG Loyalty Card discounts for branded medicines and other non-medicines items for sale in TGP.” 

This is fair and I agree with this reasoning.

2. “We are yet to obtain the computer (or software) that we could use to process your discount”

Well, this is understandable, because most The Generic Pharmacy Branches don’t have a computer to process the receipt. In fact, I can’t remember the time when I received a receipt for the medicines I purchased from TGP. Maybe I should alert the BIR about this.

3. “We only give PagIBIG Loyalty Card discount for medicines with prescription.”

OK. This reason is making me think that The Generics Pharmacy DO NOT want me to avail any discount using my PagIBIG Loyalty Card.

4. “We only give discount for the medicines that will be used by the PagIBIG Loyalty Card holder.”

The TGP vendor asked me “Ikaw ba gagamit ng gamot?” made me so furious. This is the last straw and this made me think of NOT buying any generic medicine from TGP again.

I am not sure if the PagIBIG Loyalty Card is honored by other “partner” establishments but my experiences with The Generics Pharmacy made me doubt PagIBIG’s promises. I felt short changed.

My advice for those who are thinking to avail the PagIBIG Loyalty Card is that they change course. Don’t waste your money. It is better that you try other loyalty cards than the one offered by PagIBIG.
.

Saturday, May 30, 2015

Jollibee Party Price 2015

Is Jollibee party heavy on the budget? How much money should I save for the food package? These are some of the questions that you might be asking as you plan your child’s Jollibee party.

So to help clarify some of your questions, here are Jollibee Party price for 2015.

Jollibee Party Fee

A fee of 1,250 pesos is automatically added to the cost of any Jollibee party. The party fee pays for the use of the venue and these Jollibee party favors: appearance of Jollibee mascot, 20 game prizes, 10 boxes of crayons, 30 balloons, and 1 message board.

Jollibee party items for 2015

Of course, you can add more items but it will cost you more. Each additional item has its own price. Check it out in the Jollibee Party website.

Jollibee Party Food Packages

Jollibee has 4 standard food packages for Jollibee parties. Here are the prices for each Jollibee Party food package for 2015:

Jollibee Party price 2015 for Food Package A
Jollibee party food package A.

Jollibee Party price 2015 for Food Package B
Jollibee party food package B.

Jollibee Party price 2015 for Food Package C
Jollibee party food package C.

Jollibee Party price 2015 Food Package D
Jollibee party food package D.

There is also a “Create Your Own Package” but I didn’t include that in this post. You can check it out in the Jollibee party website.

Jollibee Party Cake

Your child’s party will never be complete if there is no cake. So, Jollibee also offers cake for it party packages.

Jollibee Party price 2015 for cake

One medium-size costs 900 pesos while the large-size cake costs 1,100 pesos.

Jollibee Party Price for 2015

Summing up the party fee, food package fee, and the cake the Jollibee Party price for 2015 for 30 persons would range from 6,470 pesos to 8,920 pesos.

---

Read more of my post about Jollibee party:

How to Plan Your Jollibee Party
Jollibee Party Brochure
Party Items for My Bestfriend Jollibee Themed Jollibee Party Package
How to Create Your Own Meal for Jollibee Party
Party Items for Jollitown Themed Jollibee Party Package

Images inn this post was obtained from the Jollibee party website.
.

Wednesday, May 20, 2015

Jollibee Party Theme Fun-tastic Factory Coming Soon

A new Jollibee party theme is in the works and it will be unveiled on the first day of June 2015. This Jollibee party theme is the Fun-tastic Factory.

The announcement of the new party theme is posted on the Jollibee party website but no other details were provided. We can be sure, however, that the Fun-tastic Factory Jollibee party theme will be filled with exciting giveaways and other surprises that the kids will surely love.

Jollibee Party theme: Fun-tastic Factory
(Source: Jollibee Party website)

Jollibee currently has the following party themes:  Hello Kitty party theme, My Best Friend Jollibee party theme, and Jollitown party theme. The Fun-tastic Factory party theme will replace the My Best Friend Jollibee party theme.

Those who will book their party on and after June 1 can now choose the Fun-tastic Factory party theme for their Jollibee party. You can also choose other Jollibee party themes like Hello Kitty party theme and the Jollitown party theme on that date.

---

Read my post, How to Plan Your Jollibee Party, to know how to book or plan your Jollibee party using the Jollibee party website.

For more information, please read the Jollibee Party Brochure,  and the following posts:


LEAVE A COMMENT below or send me a private message through my Contact Me page for your questions about Jollibee party.
.

Sunday, May 3, 2015

How BPI Penalized My Checking Account

Do you have questions about BPI Checking Account? Ask me directly by following my Facebook page and leaving a comment or message.

I committed the gravest blunder that any BPI Checking Account holder could ever do. That blunder is forgetting to fund the BPI Checking Account.

I issued checks to a real property developer as payments for our PagIBIG Housing Loan. Each check were dated to be cleared or encashed every 15th of the month. Unfortunately, because of busyness of my daily life, I forgot to fund the check prior to the clearing date. I only realized this on the day of the check’s clearing date so I immediately transferred funds using my BPIExpressOnline account.

My effort was too late. The Bank of the Philippine Islands (BPI) immediately penalized me with a whopping 2,200 pesos, which they called as “Unfunded Check Service Charge”.

BPI Logo

I was furious. I wanted to call the BPI hotline and shout at their call center agents.

Good thing that I didn’t do any of that because a little Internet research revealed that it was not BPI’s fault. The Bangko Sentral ng Pilipinas (BSP), which is the country’s central bank, issued Circular No. 681 that requires banks to return unfunded checks or checks with insufficient funds to the Philippine Clearing House Corporation by 7:30 the next day after the day when the check was presented for clearing.

This only means that banks have no choice but clear on the day indicated on the check. This also means that BPI and other banks had to penalize the checking account holder.

I learned from this grave mistake so I make sure that my check is always funded. I’m also thinking of applying to BPI’s Check Protect to prevent another unfunded check incident to happen.
.

Saturday, April 11, 2015

How to Obtain Your Baby’s Birth Certificate from Manila City Hall

Every child born in the Philippines is required to have a birth certificate. Our Little Ahab is not exempted from this requirement so I went to Manila City Hall to request for his birth certificate from the Civil Registry Office.

Why do I have to go to Manila City Hall for my baby’s birth certificate instead of going directly to National Statistics Office? Well, the reason is that the hospital where Little Ahab was born is located in Manila. Another reason is that the birth certificate from the National Statistics Office (NSO) will only be available 6 months after Little Ahab’s birth.

Do you want to know how to obtain your birth certificate from NSO? Read my post "NSO Birth Certificate Delivery".

Requirements for Birth Certificate Request

The following are the requirements when requesting for birth certificate from the Civil Registry Office:

1. Certificate of Live Birth from the hospital or the midwife

2. Application Form for Birth Certificate, which is available at the Civil Registry Office

3. 50 pesos for local copy of birth certificate, 160 pesos for SECPA with NSO authentication, 190 pesos SECPA with NSO authentication and transmittal, and 240 pesos for SECPA with NSO authentication and transmittal with supplemental

Procedure in Requesting for Birth Certificate from Manila Civil Registrar

Step 1: Get application form from the “Step 1” window. Fill out the form then return it to “Step 1” window with the photocopy of Certificate of Live Birth. The clerk might require you to show the original Certificate of Live Birth.

Step 2: Wait for your baby’s name to be called by the clerk at “Birth Certificate Application” window to get the form that already has the registry number and fee.

Step 3: Pay fee at the “Payment” window.

Step 4: Go to the “Scheduling” window to get the schedule when you should pick up the birth certificate. Don’t forget to get the claim stub.

Step 5: On the day indicated on your claim stub, go to the “Releasing Section” and show your claim stub and receive your baby’s birth certificate.

Requesting your baby's birth certificate from Manila City Hall are easy with the above 5 steps. I spent about 1 hour from Step 1 to Step 4. Manila's Civil Registry Office requires birth certificate applicants to return the next day just to get the birth certificate.
.


Sunday, March 8, 2015

How to Renew Your Philippine Passport

I previously posted about the 7 handy tips that you must know when renewing your Philippine passport. Those 7 tips will help you avoid mistakes that will cause hassle to your day in DFA Consular Office.

Now, in this post, I list the steps that I went through when I renewed my Philippine passport last December last year. Take note that the steps posted here is only for DFA Consular Affairs office in ASEANA Business Park located along Macapagal Boulevard, Paranaque City.

Before going further to the step-by-step procedure, you should know first the following requirements for Philippine passport renewal:

1. Your expired or expiring Philippine passport
2. e-Passport Application Form (with confirmed appointment) that you got from the DFA online appointment system
3. At least two valid IDs that contain your recent photo, refer to my post “Acceptable IDs for Philippine Passport Application” for the list of valid Ids
5. Photocopy of expired or expiring Philippine passport. The pages that you must photocopy are the page that contains your photo and details, and the last page of the Philippine passport.
6. Supporting documents that will prove your identity. These documents are optional but you should bring it just in case the DFA demands it. Read my post “Acceptable IDs for Philippine Passport Application” for the list of acceptable supporting documents.

Philippine Passport
(Source: Wikipedia)

Step-by-Step Procedure in Renewing Your Philippine Passport


Step 1: Set appointment in the DFA website

The very first step is by going to the DFA website to set an appointment for your Philippine passport renewal. Their system will let you choose the date and time when you will go to DFA – Consular Affairs Office. You can also set an appointment not only to the Consular Affairs Office but also to the DFA satellite offices around the country.

Read my post “How to Set an Appointment for Philippine Passport Application” to guide you in making an online appointment with the DFA.

Step 2: Appointment Verification

Enter Door 5 of the Consular Affairs Office and look for the booth where you can have your appointment and documents check. Make sure that you have the complete documents before proceeding to this step.

Step 3: Checking of Application Form and Requirements

Go to Door 1 – ground floor for another verification and checking of your passport renewal application form, IDs, and other requirements. This is the step where the DFA clerk assesses you application. Make sure that you already have the photocopy of your passport, your IDs, and other documents before going to this step. You’ll get a billing form in this step.

Take note that this is where you will spend a long time queuing in this step. I actually spent almost an hour waiting in line.

Step 4: Payment of Fees

Go to the second floor (of Door 1) and look for the Cashier Window where you can pay the fees for Philippine passport renewal. Just provide the Billing Form that you obtained in Step 3 when paying. Don’t forget your obtain your official receipt.

Step 5: Processing of Passport Renewal

Go to the booth where you’ll get the queue number then wait for your number to be called. This is the step for personal data encoding, photo capturing, and finger scanning. The queue for this step is also quite long so make sure you have a book or tablet to while away the time. Don’t forget to obtain the Claim Slip after this step.

Step 6: Claim Your Philippine Passport

Return to DFA Consular Affairs office on the date indicated on your Claim Slip. Enter Door 5 and go to the Releasing Section (Window 36) and give your official receipt and Claim Slip to the clerk. Wait for your name to be called to get your new Philippine passport.

I spent less than 30 minutes before I got my new Philippine passport. I suggest that you check if your name and other details in your passport are correct before you leave the DFA Consular Affairs office.

Take note that Philippine passports unclaimed for 6 months or more will be cancelled.

So these are the steps in renewing your Philippine passport in the DFA Consular Affairs Office. Please be reminded that DFA may change the procedures and the steps posted here might not be applicable in the future.

---

Do you have other concerns with the Philippine passport? Be guided by reading the following posts:

Tips on Applying for a Philippine Passport
How to Set an Appointment for Philippine Passport Application
7 Handy Tips for a Hassle-Free Renewal of Philippine Passport
How to Cancel Appointment for Philippine Passport Application
Acceptable IDs for Philippine Passport Application
Applying for a Passport? How to go to DFA Office

Share your questions or reactions regarding the renewal of Philippine passport by a leaving a comment on this post.
.

Thursday, February 26, 2015

7 Handy Tips for a Hassle-Free Renewal of Philippine Passport

Last year, my boss told me that I had to prepare for another office-sponsored trip to Malaysia. I was excited and happy, of course, for another opportunity of traveling outside of the Philippines. But there’s a catch: my Philippine passport is already expired.

As we all know, the Philippine passport is our ticket to legally get out of the country. So, I had no choice but to go the Consular Affairs Office and renew my Philippine passport.

The passport renewal process was not awful but it took me almost a whole day (renewal application + claiming of new passport) just to get my new passport. Aside from the usual time-wasting queue, I didn’t experience any other hassle when I renewed my passport.

Philippine Passport


So to help you have the same hassle-free experience as me, I suggest that you follow these handy tips:

Tip # 1:  Avoid the Street Vendors
 
Ignore vendors of brown and plastic envelopes outside of the Consular Affairs office. You don’t need those things. All you need to submit is the passport renewal application form, photocopy of your valid IDs, and photocopy of your old passport.

Tip # 2: Set Online Appointment

Set an appointment through the DFA website first before going to the DFA Consular Affairs office. Read my post “How to Make an Appointment for Philippine Passport Application” for the step-by-step procedures setting an online appointment for passport application and renewal.

Tip # 3: Avoid Fixers Like the Plague

Don’t deal with fixers because (1) it is against the law and (2) some fixers provide their clients with fake Philippine passports. It’s better to waste time because of the long queue than be blacklisted by DFA and Bureau of Immigration because of fake passport.

Tip # 4: Avoid Bringing Companions

Only people with appointment and passport renewal form can enter the DFA Consular Affairs office. Security guards will block your companions and they will have no choice but to wait for you outside. This is a big hassle for them because the application process may take for more than an hour.

Tip # 5: Photocopy all Documents

Photocopy your valid ID, the passport renewal application form, and your old passport before going to the DFA Consular Affairs office because the photocopy services in the area are overpriced.

Tip # 6: Be the Early Bird

Go to DFA early, or at least an hour before your appointment because you can enter their office even before your appointed time. It happened to when the guard allowed me to enter at 1 PM even though my appointment is 2 PM.

Tip # 7: Beware of Thick-Faced Singiteros

Be alert and always mind your queue. There are many Pinoys who will do their best to cut the queue instead of going to the end of the line.

Renewing your Philippine passport will be less of a hassle when you follow these tips. I know that there are more tips that you can share with us when it comes to renewal or first time Philippine passport application. I suggest that you share those tips with us through the comment box below.
.

Thursday, January 8, 2015

Why You Should Hire a Professional Translation Agency

I always go to Google Translate whenever I encounter non-English words or sentences. This translation tool from Google is perfect for my personal use even though I read negative comments about it. Some people say that Google Translate doesn’t give the correct translation. What’s worse is that it can’t translate idioms in non-English language.

Google Translate is good enough for personal non-professional use but this tool will be a disaster if used by professionals and corporations. If this is the case then what should professionals and organizations use to translate their documents? The answer is hiring a translation agency.

Aside from obvious advantages compared to free translation tools, the following are the reasons for hiring professional translation agencies:

1. Professional translation agencies offer specialized services for various fields (i.e. legal, medical, technical, and financial).

2. Professional translation agencies offer translation services for a wide range of languages. Rosetta Translation, which is a professional translation agency, offers translation for 23 languages.

3. Compared to free translation tools, professional translation agencies have team of highly qualified experts like translators, proofreaders, and editors.

4. Professional translation agencies provide services that are tailor-made for their clients. This is means that clients will get translation results that fit their needs.

5. Professional translation agencies are strict in quality control and adhere to international standards. This guarantees that clients will high quality translated documents that meet their requirements.

There are more reasons to hire professional translation companies but the ones I listed on this post should be enough to convince you to ditch free translation tools.  Don’t go to Google translate for your professional translation needs. Go to professional translation agencies.

---

This post is brought to you by Rosetta Translation.
.